Bloggers like to be energetic and niche to write new articles in their blog and there are many ways to do that. One way is the Desktop wallpaper. I change it according to my mood. 😀 I installed Windows 7 Ultimate (Trial Version). And by seeing Windows 7 wallpaper I felt so good.
I had an idea to convert that image into watercolor effect or grunge design, so the first tutorial will be watercolor effect. You know any colorful image can be converted into watercolor effect through easy 5 steps. The filter effect in the Photoshop makes the tutorial easily understandable even to a newbie.
RELATED : Create Zoom Effect using Adobe Photoshop
Step 1 : Open the new document or directly open the image in Photoshop.
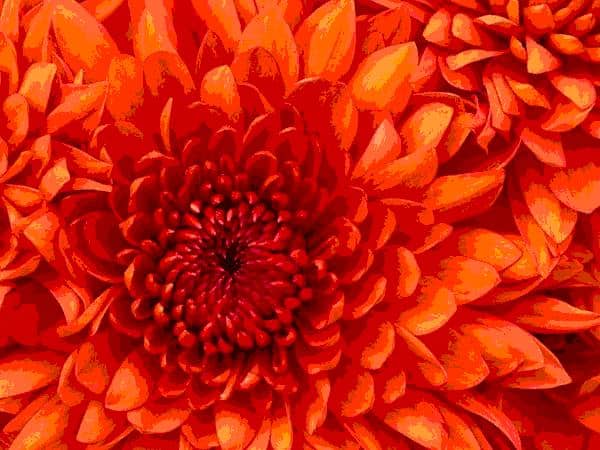
The source used here is default wallpaper from windows7; you can use any other images or this one if you have Windows 7. Anyhow we are going to use this for personal use only. 😉
Step 2 : Select the menu | Image | adjustment | Hue and saturation
Now change the value of the saturation to 50% and hit enter. Don’t change any other settings.
Step 3 : Now open the Filter Gallery menu from Filter menu.
Here we are going to add four filter effects. They are artistic, texture, brush stroke, and distort.
Tip : When adding one effect don’t enter, we have to add more effects and by using press clicking the new icon in the bottom of the window.[ It can save you some time and you can get the preview and change the value ] 8)
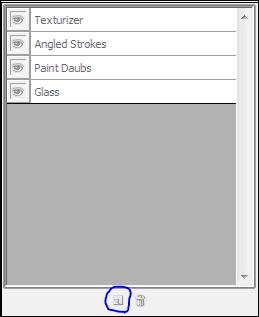
- Texture menu and select texturizer and give the value :

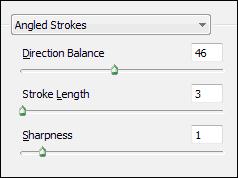
- Brush strokes | Angled strokes
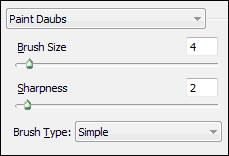
- Artistic menu select | Paint Daubs
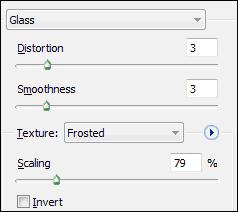
- Distort | glass
Now enter Ok.
[Plastic warp is the optional but if you want you can do it. 5-11-8]
Step 4 : Duplicate the images by Ctrl + J or right click the layer and select duplicate layer.
Desaturate the duplicated the image by pressing Ctrl +Shift+U or under Image | Adjustment | Desaturate.
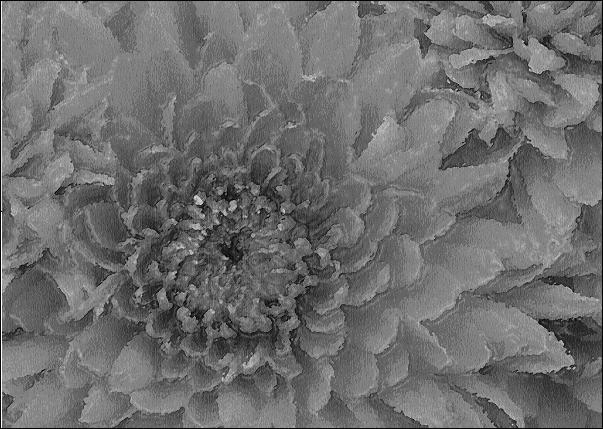
Change the Blending mode in to Overlay or Multiply and decrease the opacity according to your choose image. Here I used 30 To 45.
Step 5 : Now select the desaturated image and choose Stylize menu and Emboss and give the values according to your image.
Remember the value should be less for height and amount.
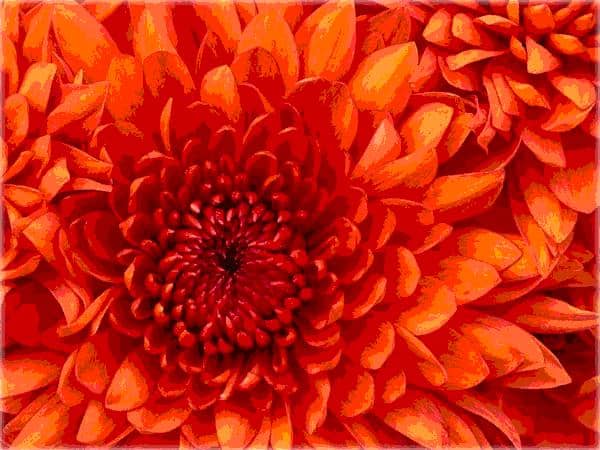
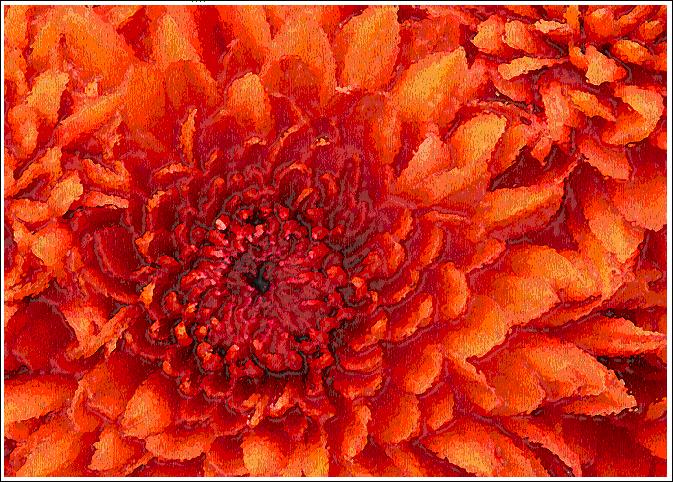
And the final result :
And still you can do wonders, just by playing with blending mode and filter effects.
| Need Photoshop basic tutorials here – comment on it|
Personal note : Here I mentioned like “adjust the values according to your needs/ image “, reason – for good practice and playing with values gives different results. 😀
This article is guest author Sri Ganesh.M. He is a young blogger and Founder of “AnimHuT” Creative Blog. He found his passion for designing recently. He is doing Graphic Design and illustrations right now! You can Follow him on Twitter too.


Great tips effect I like it so I am learning Photoshop and other web design tutorials online
That’s pretty simple and well said.. Thanks for the share 🙂
l just say Beautiful !!!
Excellent tutorial on how to use the watercolor effect or grunge design on your desktop wallpapers. I love using a variety of wallpapers on my machine. I just wrote something on my blog about using Flickr to get desktop wallpaper images. Alot of us know that you can download images from flickr. I recently found a program called Downloadr. It downloads whole groups of images from Flickr very fast! It allows you to sort images by tags, date ranges, and interestingness. I use it all the time to download a whole batch of images.
What a nifty little trick! I can definitely use this on future photo editing ventures.
Great tutorial .
thanks for sharing
very nice and beautifull tutor..
.-= sudharsan @ technoskillonline’s last blog…Badjuju just happened !? – Commentluv Problem solved =-.
Hi,
Thats great,Actully I was thinking to go for photoshop.I really enjoyed the article.Thanks for sharing.
thanks for comment schraber . happy you like it 😀 any doubts related to this post ask me. 😉
Its so well explained. Even a Non-Photoshop user like me can go master it.
NiceOne
thanks for the comment
Any idea , if these functions can be extended to programs like GIMP. Being a linux user, i cant get adobe photoshop or corel working on my PC
thanks for the comment and i am not familiar with gimp – don`t know why it doesn’t install in my pc. but gimp has some lot work do different than psd. you can create lots of texture and from it 😉
Hi, I plan to stencil my foyer with a damask wallpaper effect. Can anyone give me some tips? I thought I’d roll the stencil design on. Can I do the pattern at randam or should it line up? Any tips for going up the stairs? Thanks.
i have done some stencil works , other one i dont know that much. you can play with the effect and who know may be you get he better results
Tutorial was explained well with pics. Thanks Pradeep. More tuts needed regarding this.
thanks for the comment sonu, i hoped you have learnt some new tricks 😀
Thanks for the Valuable information and i liked your way to teach us about photoshop
nice Ganesh 😉
thanks lawrence , i hope your like it. 😀
its good simple n neat…
thanks karthick , and supporting me all the time 🙂
Totally great tutorial though I’m not a Photoshop geek.
thanks phaoloo , i like it even though you are not a Photoshop geek. much appreciated 😉
Nice one. I am learning Photoshop and other web design tutorials online. And its good you made this post.
ramesh , thanks for the comment, if you have any doubts ask it. this is my first post here, your valuable comment encourage me to write more tutorials 😀
Great tutorial Ganesh 🙂 🙂
This tutorial i will surely use for my upcoming post images 😉 🙂
Thanks 🙂 🙂
thanks for commenting, i hope you like it. 😀