Does it ever happen to you that you accidentally end up deleting valuable Facebook messages? It might be accidental or it might even be on purpose. Maybe in a fit of rage you delete someone’s text messages only to regret that decision later.
Basically, as humans, we all make mistakes. Deleting valuable Facebook messages and pictures is just one of those grave errors. Most people think that once you delete pictures from Facebook, they’re lost forever.
However, that isn’t true at all. Sure, it isn’t as easy as recovering files from the recycle bin, but it is possible to recover deleted pictures on iOS devices. In this article I’ll introduce you to a software that has been designed for the sole purpose of recovering lost Facebook messages and pictures.
You can use a dr.fone iPhone Data Recovery software as it can retrieve all your Facebook messages and pictures without causing any other problems. The data can be recovered from three primary sources:
- From the iPhone directly.
- From the iTunes backup.
- From the iCloud backup.
I’m personally recommending dr.fone as it’s one of the most reliable softwares in the world when it comes to dealing with wide range of software issues. Furthermore, dr.fone has been rolled out by Wondershare, one of the world’s leading tech enterprises which has been critically acclaimed by such reputed outlets as Forbes and Deloitte.
When you’re doing something as precious as recovering valuable messages and pictures, you should make sure your tool is 100% trust-worthy. With millions of satisfied customers, dr.fone is definitely the most reliable choice.
You can read on for a detailed description of all three solutions to recover lost Facebook messages and pictures..
Solution #1: Recover deleted Facebook Messages and Pictures from iPhone directly
This is the first solution you should try. With this method, dr.fone — iPhone Data Recovery will try to retrieve your Facebook Messages and Pictures directly from your iPhone. As such, it’s also the simplest method to try. Simple follow the given steps.
1. Install dr.fone and launch it.
2. Click on the ‘iPhone Data Recovery’ part of the menu.
3. Use a USB chord to connect your iPhone to the computer. dr.fone should automatically detect your iPhone.
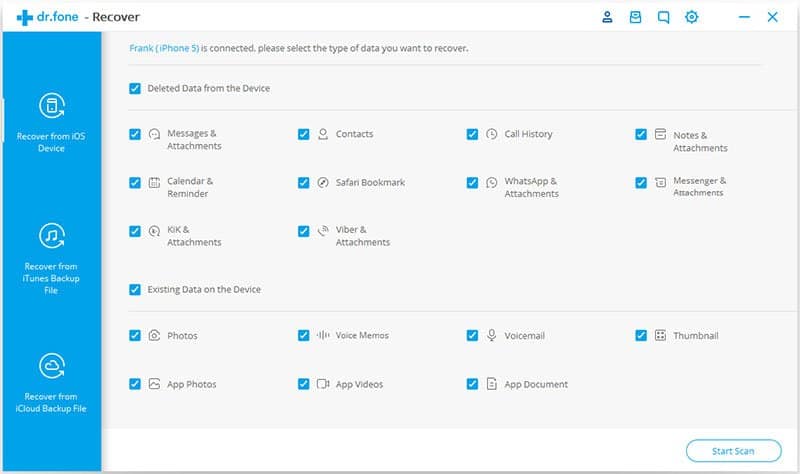
4. On the left hand side, you’ll find a blue panel with three options. Select ‘Recover from iOS Device.’
5. In the right-hand side of the interface, you’ll be able to choose between various file types. Select the ‘Messages & Attachments’ and ‘Photos’ options from the list.

6. Now go to ‘Start Scan’ at the bottom.
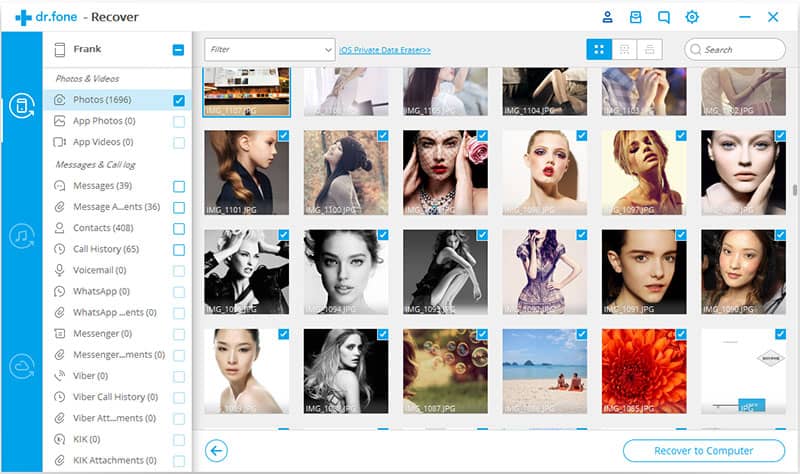
7. All the photos will appear in the gallery in the next page. The left side of the interface will have the categories.
8. Select the categories and folders appropriate to you.
9. Now scroll through all of the pictures and messages on the display gallery. Select the ones you want to recover.

10. Once that’s done, click on ‘Recover to Computer’. All the messages and photos will be stored to your computer.
11. This method will only work if remnants of the messages and images are available in your iOS device. However, if you don’t find anything you can go to either of the next solutions.
Solution #2: Recover deleted Facebook Messages and Pictures from iTunes Backup
1. This solution is only relevant to you if you use iTunes to create your iPhone backups. If you use iCloud instead, you should move on to the next solution.
2. dr.fone — iPhone Data Recovery can also be used to extract files from an iTunes backup. These backup files can’t easily be accessed, however dr.fone can not only access them but also retrieve files from them individually. If you didn’t find your Facebook Messages and Pictures in the previous step, you should try this one if you maintain iTunes backups.
3. Install and launch dr.fone.
4. Connect your iPhone to the computer with a data cable, just like in the previous solution.
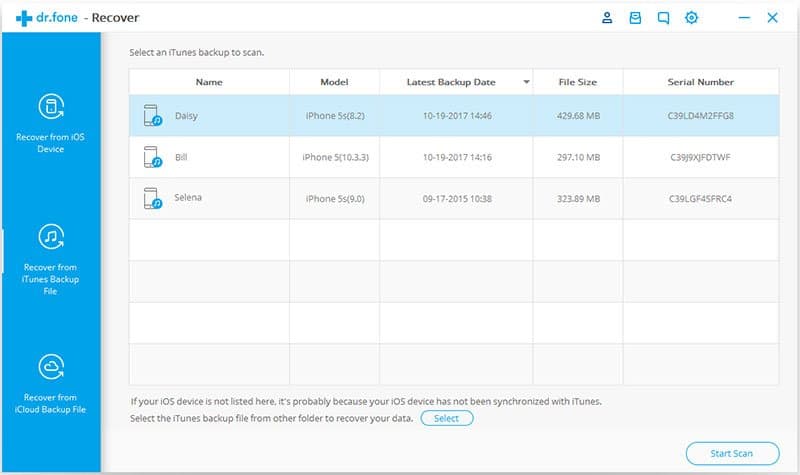
5. In the blue left-side panel, select the option ‘Recover from iTunes Backup File’.
6. You’ll be able to view all the backup files in your iTunes across all your Apple devices. Select the right iTunes backup based on device and date. Click on ‘Start Scan’.

7. A gallery will open up. You can browse the categories and folders in the left hand panel.
8. Choose the category correlating to Facebook Messages and Pictures.
9. Browse through the gallery of messages and pictures and select them.
10. Now you can choose to either ‘Restore to Device’ or ‘Recover to Computer.’
11. This method should definitely work if you have a habit of maintaining regular iTunes backups. If you use iCloud for backups instead, you should check out the next solution.
Solution #3: Recover deleted Facebook Messages and Pictures from iCloud Backup
1. If you use iCloud for all your backups, you need to follow these given steps.
2. Install and launch dr.fone. From the menu, select the ‘iPhone Data Recovery’ option.
3. In the next window, select the ‘Recover from iCloud Backup File’ option from the blue right side panel. You won’t have to connect your phone to the computer for this solution.
4. Enter your Apple ID and password to gain access to iCloud.
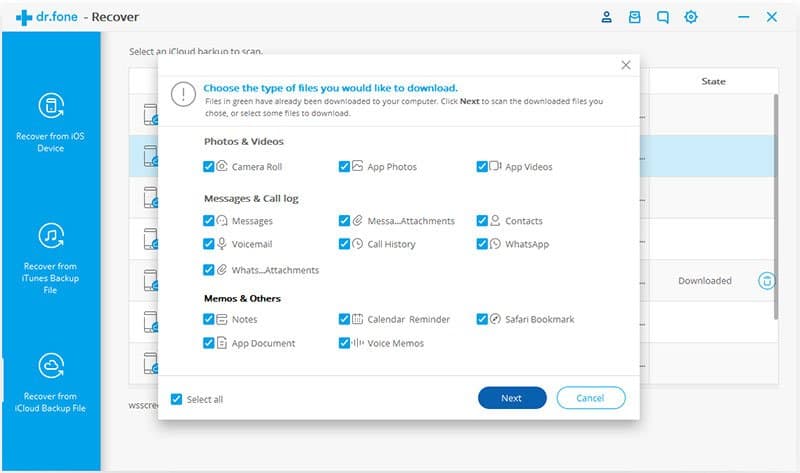
5. In the next window, you’ll find a whole list of backup types across different devices. Choose the one most relevant to you.
6. Once you’ve selected, click on ‘Next’ to download the backup file to your computer. Since you’re downloading it from the internet, the duration will depend on the speed and file size.

7. Use dr.fone to access the downloaded iCloud backup.
8. You’ll have to select the categories. Select Facebook Messages and Pictures.
9. Go through the messages and pictures in the gallery and select the ones you want to recover.
10. Click on ‘Recover to Computer’ once you’ve selected them.
With these simple steps, you can recover all your Facebook Messages and Pictures. The solution you use depends entirely on where you save your information, however one of them will surely work for you.


